Home About Me Travel Expat Life Image Map
Showing posts with label Decor. Show all posts

Friday, October 18, 2013

Easy Postcard Project For Travel Memories

I'm not very crafty, creative, or otherwise talented in the DIY arena most of the time.  I get easily intimidated by crafts and creative projects.  However, one thing I do love (and I like to think I excel at) is being a pen-pal... and anything else related to stationery and cards.  I have always loved to write and send letters, cards and postcards, and for as long as I can remember, I've been in the habit of sending at least a few postcards whenever I travel somewhere.  So when we moved to Australia, I wanted to make sure I kept that habit.  Something I also really wanted to prioritize during our time here was keeping track of all the places we've seen and all the memories made in those places. 

So when I stumbled on this simple travel postcard project idea from my all time favorite blog Young House Love just a few weeks before our move, I knew it was a craft/DIY project I could definitely handle!  It's so easy for me, because it involves something I do anyway.  When I'm picking out postcards to send to a few friends/family during a trip, I just make sure I remember to pick out one extra for us!  Then, all you do is write a postcard to yourself describing what you saw, did, loved, favorite places, funny travel mishaps, etc. on your trip.  Then I just bring it home with us, and toss it in this dish on our coffee table.  It's fun to look through them from time to time and it's a great conversation starter- PLUS it looks pretty!

Our collection so far- 19 and counting...

A few of our recent postcards


Postcard project on our coffee table (among the few Fall decorations I have)

Here's the link to the original project idea found on YHL:
http://www.younghouselove.com/2008/08/post-haste/

 photo signature.jpg

Monday, December 17, 2012

Deck the Halls!

Christmas has always been one of my favorite holidays.  I love the music, decorations, anticipation, shopping for gifts, and general good moods that seem to take over.  This year though, between knowing that I will be away from family and friends and the strange experience of having to celebrate Christmas during summertime,  it would be very easy for me to get all "scrooge-y" this holiday season.  BUT, I am determined not to.  I've been making every effort to get in the Christmas spirit this year, and one of the things that has helped the most is decorating our house!  And I've got to admit- for as few decorations as I was able to bring with us in our move, I think I did a pretty darn good job!  It definitely feels a little more Christmas-y around here! 
 
 
I started the Christmas-ification with this Pinterest-inspired take on a wreath.  Go here for the original link.
 
 
And what's Christmas without a fake tree?!


Before and After: 


So that's what Christmas looks like at our house this year.  Merry Christmas, everyone!

Tuesday, December 11, 2012

Australia House Tour Before/After


When we found out we would be moving to Australia for David’s job, one of my first concerns was where in the world we would live.  We were lucky though because we didn’t have to deal with the stress of house-hunting in a foreign country – although the image of us on HGTV’s House Hunters International did cross my mind. J  David’s company provides housing for their employees who move here, so all we had to do was show up at what would be our new house when we arrived. 
David arrived about a month and a half before I did (July), while I stayed behind to wrap things up with packing, selling our house, and some last visits to family and friends.  David was able to move right into the house when he arrived (even though our belongings weren’t there yet), because the houses the company provides are pretty much fully furnished.   Here are some photos of the house from right before David moved in.  A couple of the photos show empty rooms, but don’t worry, the furniture in those rooms WAS moved in before he arrived. 
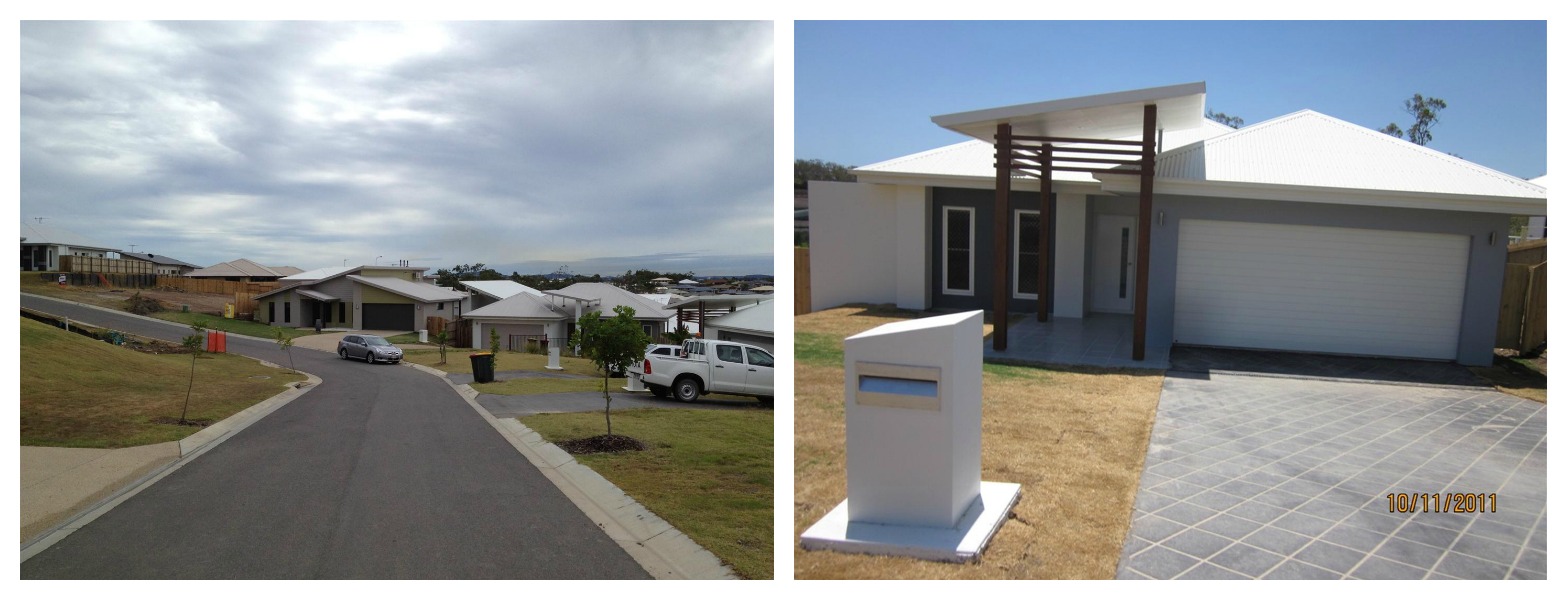
This is the view of the front of the house.  The photo on the left shows our street- our house is the one behind the Subaru, and the photo on the right is the front of our house (ignore the date- it was taken right after it was built).  Don’t you think the houses here look pretty different than what we’re used to in the US?  They all have metal roofs to help reflect the heat, but I still just can’t get used to that. 

After walking in the front door, there is a little entry way with a door into the garage and access to the laundry room- which is actually a pretty nice size.   

Then you move into the main area of the house.  This part of the house is very open- kitchen, living, dining in one open area.  This view is taken standing in the kitchen looking out toward the back of the house.  I love, love, LOVE houses with lots of windows and natural light, so I was happy about that feature of this house. But MAN, the sun here is just SO strong, that I swear I get a sun burn INSIDE our house.
 
These views of the kitchen are taken standing in the living room, looking back toward the front of the house where.  Again, see the crazy amount of blindingly bright white everywhere?!


Looking back toward the living area, there is a patio off the back of the house.  The house itself is on a hill, so although you can’t see it from the front, the back part of the house is raised above ground.  Our patio looks over the main street coming in to the neighborhood.  We do have a backyard, but you have to go down stairs to get to it. 


Off of the living room, to the immediate right is the master bedroom.  Kind of a weird setup if you ask me.  This photo of the master bedroom was taken before the bed was brought in- I promise you, David didn’t have to sleep on the floor.  The master bathroom is a nice size, but so weird that there is no door between it and the room itself.  This is especially annoying when your husband wakes up to get ready for work at 4:15 every day. 
 
There is also a small office:

And two identical guests rooms with one guest bathroom.  These photos are of just one of the guest rooms. 
 
So, that is pretty much how the house looked when I arrived at the end of August.  And actually, it stayed this way for another six weeks or so while we waited for our moving shipment to arrive.  We had a 1,000 pound limit on what we could bring over, so while I would have liked to have brought all of our furniture, decorations, etc. (because, let’s face it, the furnishings in the house aren’t my favorite), I couldn’t.  The only furniture that we did bring was: our bed and mattress (best idea ever!), David’s favorite chair, a rug, and a limited amount of general house decorations.  The rest of the shipment weight was taken up by clothes and kitchen gear.  Also complicating our ability to make this place more “our own” is that the landlord does not allow nails in the walls.  We are only supposed to use 3M hanging strips, and only 2 items per wall.  On the positive side, it does keep things simpler, less cluttered, and we just generally have less “crap” around.  Although don’t get me wrong, I do miss every single little thing that is in storage back in Houston and can’t wait to be reunited with it all (although I’m sure I will have forgotten what is even there by the time we return).  So anyway, here’s how the house looks now after unpacking our shipment, moving some furniture around, and creatively making do with what we have.

The front of the house pretty much the same except for a few potted plants.  Ignore the dead grass…
 
Entry way. Laundry room to the left, garage and guest room to the right:


 Living area (facing out toward the back of the house):
 
Kitchen:

 
A little storage/display area I faked:

 
Patio with a few added plants/flowers as well as some patio furniture.  This spot allows me to be an excellent neighborhood spy (I’m so nosey!):


Master bedroom now with our beloved bed and mattress: 
Oh- and take note of the ridiculous lamps- so stylish, right?  There are about 10 in the house- and every house that David’s company has furnished.  I will throw them out the window when we leave- they make me nuts. 
 
Guest room aka YOUR room when you come visit! :-)


Yes, I know it's not much different from the first set of pictures.  And trust me, I know even more so that this is a far cry from stylish and carefully decorated.  BUT we did the best with what we had, and it does FEEL much more homey now, and THAT is important since this will be home for the next 3-4 years! 

Wednesday, December 05, 2012

First Pinterest Craft Attempt

I’m fairly certain that I was one of the last people on the face of earth to jump on the Pinterest bandwagon.  I didn’t join until just a few months ago.  My reason being that I have a pretty addictive online personality- meaning that I get addicted to things like Facebook, blogs, etc. and then end up wasting more time than I’d like to admit.  I KNEW I would be obsessed with Pinterest so I purposely refused to let myself join for quite a while- especially while I was teaching (although now I kind of regret that seeing as how there are so many awesome teacher resources).   At any rate, I finally bit the bullet a few months ago, and I was right- I was almost immediately addicted.  J 

I have been pretty good about trying lots of the recipes that I’ve pinned, but I had yet to try anything crafty or DIY-y.  (Side note: I wish Pinterest would add a label or separate board or some way to mark the pins you've actually tried/created.)  Because we weren't able to bring very many decorations or wall hangings when we moved to Australia, I decided I would try and make a frame that would let me display multiple photos while at the same time covering up some of these blindingly white bare walls in the house.  Here was my pinspiration:
http://pinterest.com/pin/313281717798593690/
http://pinterest.com/pin/313281717798593691/ 

I was surprised to find out that Australia has a few of the same thrift stores we have in the states.  Here in Gladstone, we have a St. Vincent DePaul and Salvation Army.  But in true Aussie fashion, they must be abbreviated as Vinnie’s and The Salvie.  I’m trying not to shake my head and/or roll my eyes at the excessive amount of abbreviations here in Oz as I type this…   Anyways, I found the perfect frame at Vinnie’s for two bucks!  It was a pretty rough-looking white when I bought it, so after cleaning it up, I spray painted it blue.  I forgot to take a before picture.  Oops.  After it dried completely, the rest was super easy.
 
 I just used twine to create three rows for hanging pictures and secured the twine to the back with tons of hot glue. 

 
 Then I used the mini clothespins (or pegs as they call them here) to clip the photos into the frame. 

I like that I can easily change out the photos at any time.  I think it turned out pretty well for a first time Pinterest craft by someone who is not particularly crafty!  I’m thinking about trying to make a Christmas wreath (similar to this one) for the front door next.  You can follow me on Pinterest at username: Meggers315!